Todo List Card
I finished my custom Home Assistant integration and card. UI development for custom cards kind of sucks.

I think I am finally done with my custom Home Assistant integration and card! I have spent way more time on this than I needed to (this is the only thing I worked on last week). And even if my partner does not end up using it much, it brings me joy to use it myself. And I did learn a lot about Lit components, rollup, and rsync. Definitely not a fruitless effort.
Custom Card Examples
Starting with the fun stuff first, here some examples of my card on my production environment (i.e. my real Home Assistant instance).
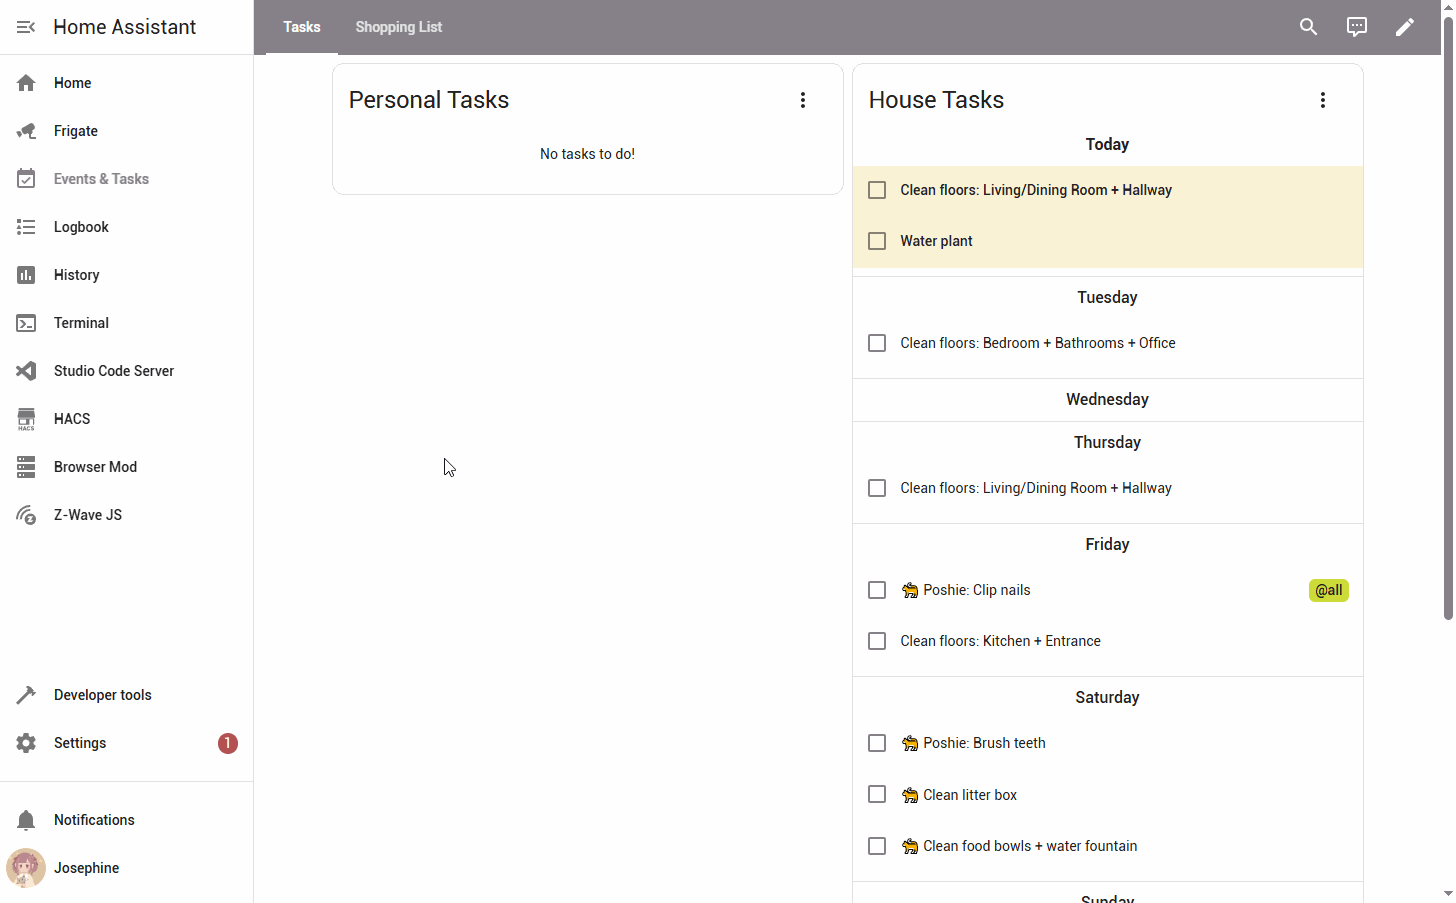
Completing a task
- Tasks for today are displayed in bold with a yellow background
- Tasks for the rest of the week are displayed in sections by day of week
- (Not pictured) Overdue tasks are displayed with the same styling as "Today", along with the original due date, in a section at the top
- Tasks assigned to my partner or to both of us, have an "@" tag on the right. Tasks without a tag are assumed to be assigned to me.
- Checking the checkbox will complete the task
- Completed tasks for this week are displayed in the "Completed" section; completed tasks originally due in a previous week are not displayed
- (Not pictured) Unchecking the checkbox will uncomplete the task and it will be displayed under the original section
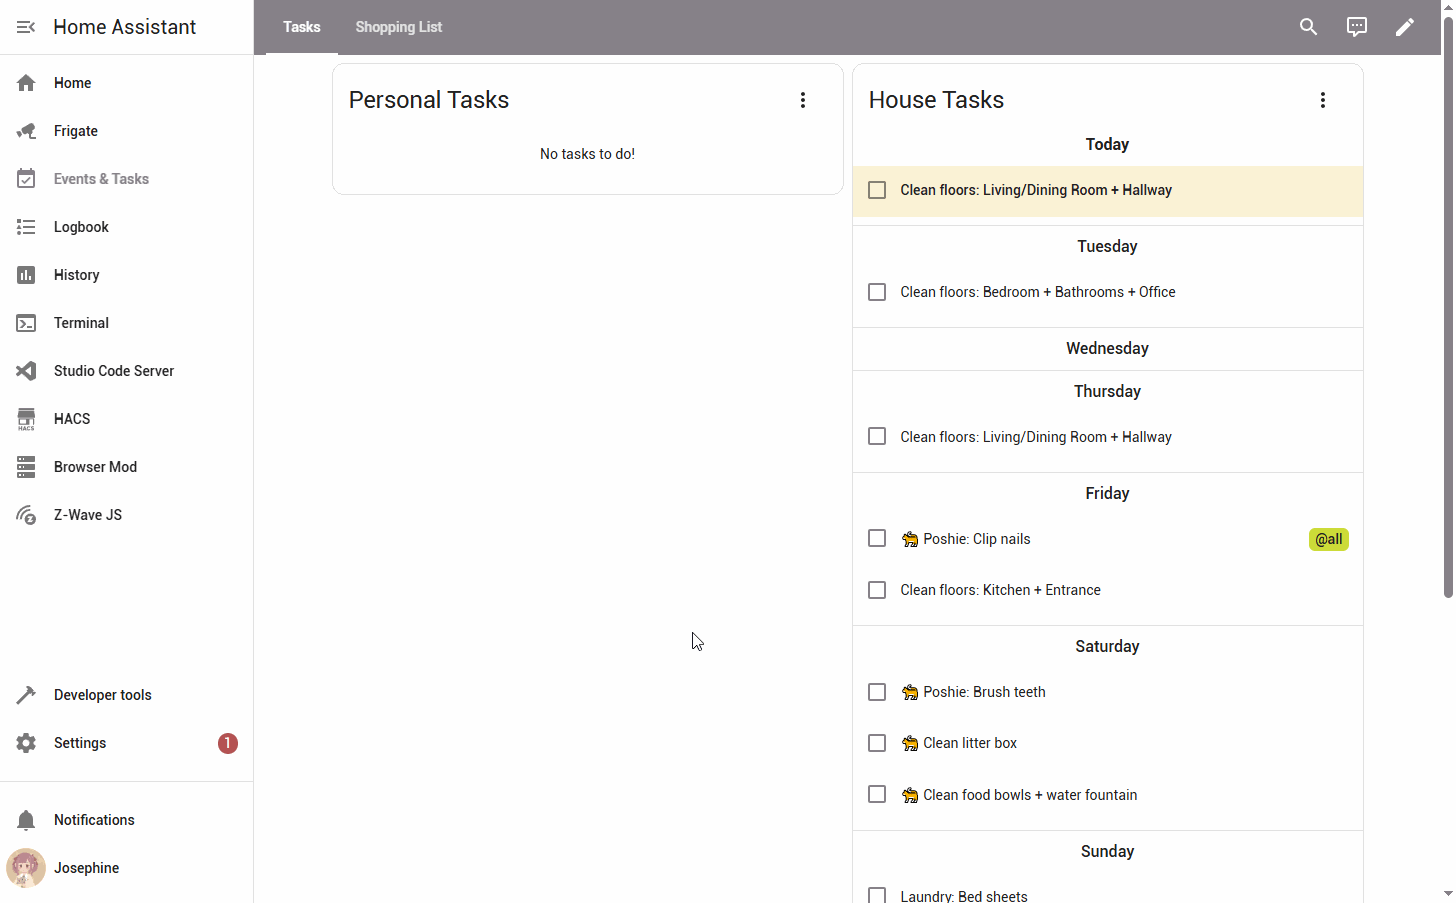
Completing and uncompleting an ad-hoc task
- Clicking on a task displays an Edit dialog to make changes to that specific instance. I'll mostly be using it to remove tasks that are so overdue that the next instance is now due (a frequent occurrence with my task to brush Poshie's teeth...). I can also reschedule one instance without impacting the due dates of future instances. I don't really use the description for anything but it's there in case I need it (maybe I need to leave a note to myself or my partner for some special circumstance).
- Clicking on a completed task doesn't do anything, since you shouldn't make changes to a task that's done. You can uncomplete the task and make changes if you really need to.
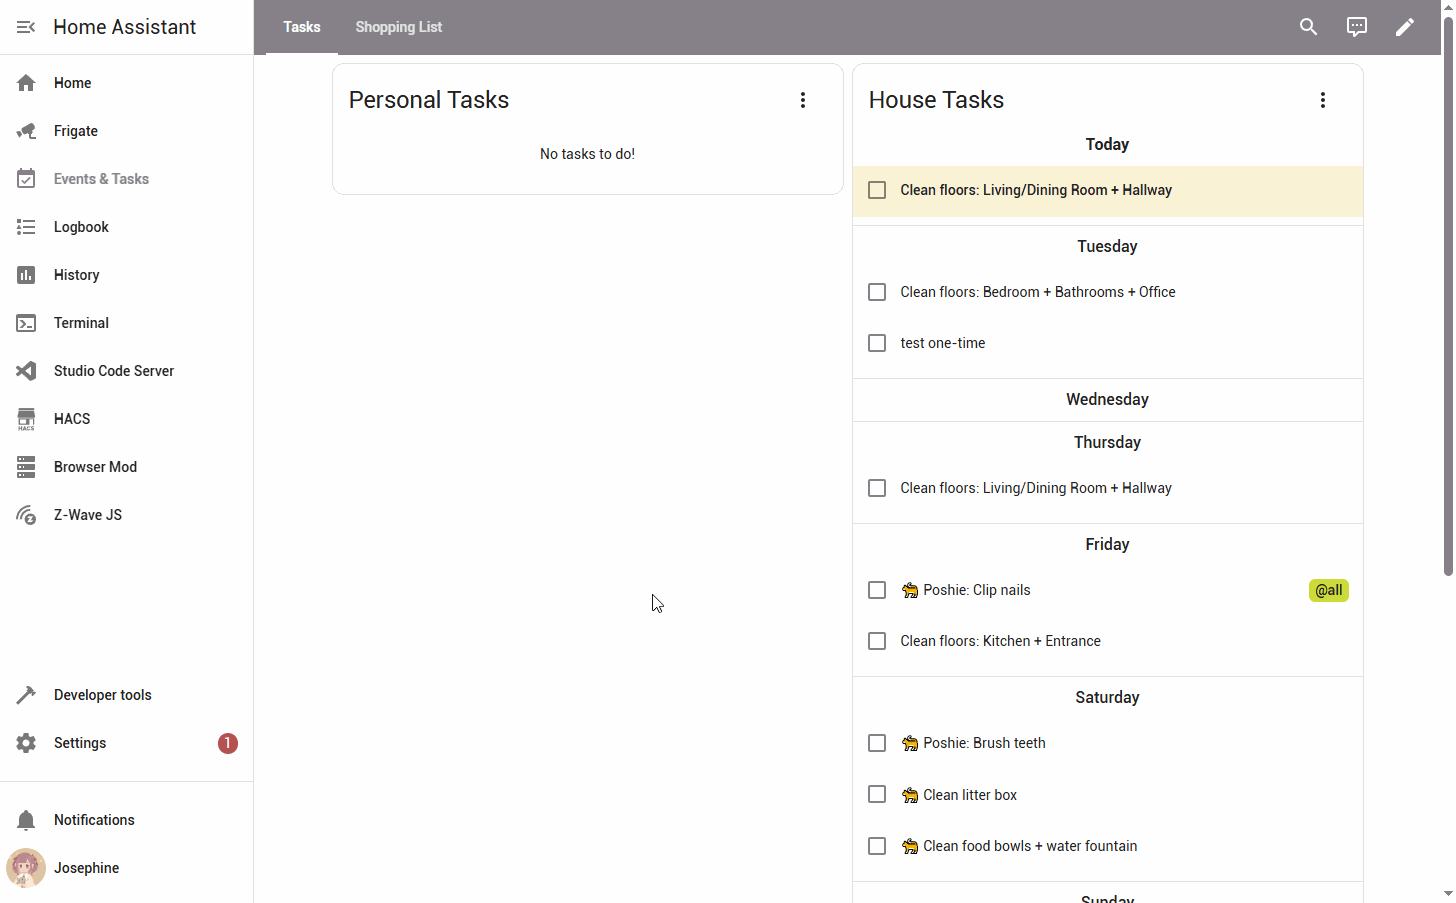
- Ad-hoc tasks that are not due this week are displayed in the "Future" section
- Checking the checkbox will display a confirmation dialog, since ad-hoc tasks have special behavior
- Due date will be updated to today (may add an enhancement to select a date but I don't really see this being a big deal)
- New ad-hoc task will be scheduled based on the recurrence rule
- Unchecking the checkbox will revert the above changes
- Due date will be reverted to the original due date. Google Calendar preserves the original start date of recurring event instances which is visible through the API but not the UI.
- Any future ad-hoc tasks with the same summary will be removed. There is no formal relationship between the previous and next instance of an ad-hoc task since they belong to separate recurring events. But if I have multiple tasks with the same summary that are not intended to refer to the same task, I should be ashamed of myself. 😞
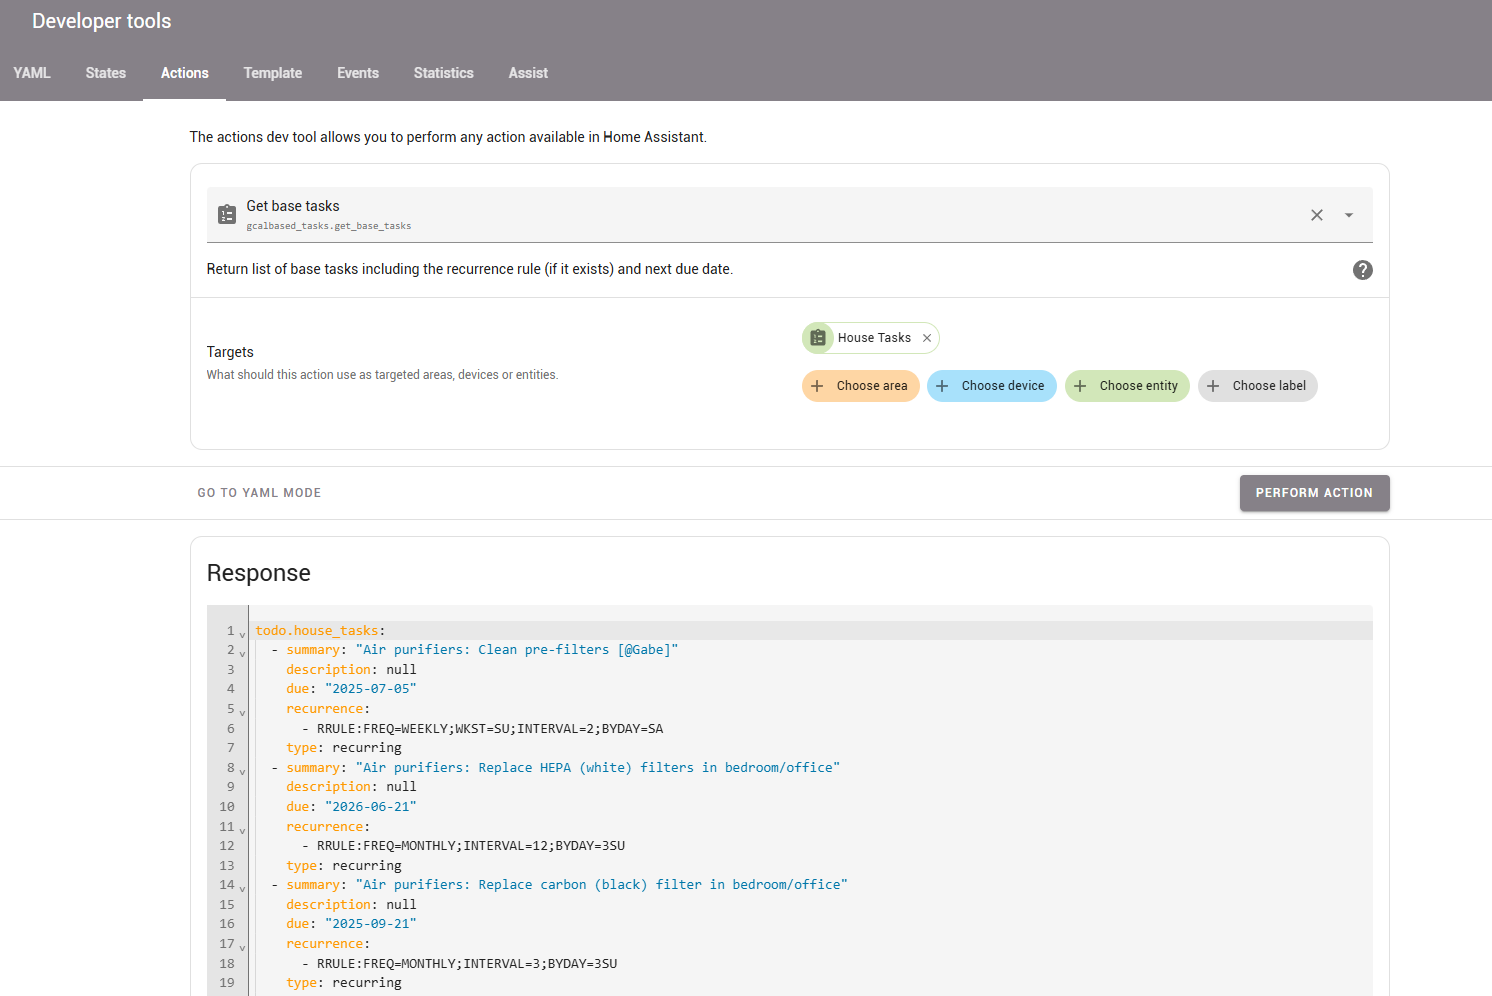
Show all tasks
The card only shows the current week's tasks, but sometimes I want to know when a task is coming up (like it is weeks away or months away?). Or I want to see the base configurations to make high-level adjustment. This is basic behavior for an actual todo list app, but I couldn't figure out how to do with the Google Calendar UI.
- Default sorted by summary, ascending
- Can also sort by type (single, recurring, adhoc) and due date (the next due date, could be in the past if a task is overdue)
- I didn't see any value in sorting by recurrence rule
Custom Card Development
I wish I had a list of all the resources I used and referenced to create the custom card but I did not document them all. I started with the official documentation for custom cards, and I was able to make something display. But it didn't really provide much guidance in how to make something more complex.
Beyond that, I referenced:
- built-in todo list card
- Which reusable components to use
- Component structure
- todo-swipe-card
- Got a lot of ideas from this given that it's also a todo list card, but it uses the real todo list card underneath, which is different from what I needed
- week-planner-card
- General package structure
- "Custom Cards with GUI editor as of 2023"
- How to use
<ha-form>to display a form to edit todo list items
- How to use
- Others that I don't remember...
I tested directly on my production environment because I wasn't worried about corrupting data or speed. All I had to do was hard refresh my dashboard to see the changes in the browser. On my phone, I had to clear the app cache, close the app, and reopen it, which was more work, but I didn't test on my phone that often. I could avoid corrupting data by creating a new calendar to use as the data source, but I like living life on the edge so I used my real calendar.
I started by WinSCP-ing into my Home Assistant server, creating /config/www/custom-todo-card.js, and modifying it directly. Everything was just in one file and I used external imports like the example in the official documentation.
UI Component Library
I started by using built-in-but-not-actually-public components for my card, but eventually ran into issues because some elements are loaded into the shadow DOM, so I could not style them directly. I thought it might be easier if I just imported a separate UI component library instead of trying to leverage what Home Assistant already has loaded (MDC, Material Design Components, which is deprecated...).
I first tried using mdui, which I tried to import from unpkg, and it sort of worked. But the styling wasn't working.
At this point, I thought creating a node package and having the library be bundled into my component could solve the issue. I did want to do this eventually so I could separate my logic into separate files. I got the package and bundling with webpack working, and added the mdui css as a separate resource in Home Assistant. Great. It works!
Just kidding! For whatever reason, it did not let me set checkboxes to be checked by default. The entire checkbox item wouldn't render. After investigating for hours probably, I came to the conclusion that it wasn't an issue with mdui. But I wasn't sure what the issue was.
My next solution was to try importing a different library. This time, I tried @material/web (MWC), the newer-not-deprecated-but-not-maintained version of MDC. I can't remember what was wrong with this, but it was even worse than mdui.
I came to the final conclusion that Home Assistant doesn't quite support custom cards that import their own UI libraries, specifically web component libraries that allow you to use custom elements like <md-checkbox></md-checkbox>. From my googling, this is a common complaint from Home Assistant developers. I guess it does make sense, though. If multiple custom cards try to import different versions of the same library, surely there would be conflicts and something will break. It's just odd that the official documentation does show importing a web component library, which gives the false impression that it would work with any library.
This brought me back to my original implementation using built-in components. I didn't want to completely implement my own components because I wanted it to look like it belonged in Home Assistant without duplicating a lot of styles. My original issue was related to using <ha-check-list-item></ha-check-list-item> and not having any control over its child elements. Well... I got around that by using the child elements directly. Such a simple solution that I went on a long journey to get to lol.
Dev Mode
For ease of testing, I added a "dev mode" to my package.
I started off using webpack because that's what I've used in previous projects. (It's also what we use at work, but I don't know too much about how it's setup at work. I know enough to investigate and debug issues, but I generally don't need to know how it works.)
I used the compiler.hooks.done hook to run rsync everytime the code finished rebuilding in watch mode.
const devConfig = {
    devtool: 'eval-source-map',
    plugins: [
        {
            apply: (compiler) => {
                compiler.hooks.done.tap('DeployPlugin', (stats) => {
                    var rsync = new Rsync()
                        .shell('ssh')
                        .flags('varzP')
                        .output(
                            (data) => console.log(data.toString('utf-8')),
                            (data) => console.error(data.toString('utf-8'))
                        )
                        .source('dist/*')
                        .destination(
                            '{USERNAME_REDACTED}@{SERVER_REDACTED}:/root/config/www/custom-todo-card'
                        );
                    console.log(rsync.command());
                    rsync.execute((error, code, cmd) => {
                        if (error) {
                            console.log(error);
                        }
                    });
                });
            },
        },
    ],
};
webpack.config.dev.mjs
Then all I had to do was refresh the browser page to see my changes! The build and deploy were generally very fast, so after saving, I pretty much can just refresh the page without waiting for the terminal output. This was excellent. Reminded me of dev mode at work. I don't really want to be reminded of work. But such is life.
But then, I noticed it was generating a very large file. 7MB! My card isn't that complicated, is it??
After some googling, I decided to switch to rollup since webpack was overkill for my project. After the switch, it was generating a 3MB file. Not a small file, but significantly better!
For reference, this is my package.json:
{
    "name": "gcalbased-tasks-card",
    "version": "0.1.0",
    "scripts": {
        "deploy": "rsync -varzP --rsh=ssh dist/* {USERNAME_REDACTED}@{SERVER_REDACTED}:/root/config/www/gcalbased-tasks-card",
        "dev": "rollup --config rollup.config.mjs --sourcemap --watch --watch.onEnd=\"npm run deploy\"",
        "build": "rollup --config rollup.config.mjs"
    },
    "devDependencies": {
        "@mdi/js": "^7.4.47",
        "@rollup/plugin-node-resolve": "^16.0.1",
        "@rollup/plugin-terser": "^0.4.4",
        "date-fns": "^4.1.0",
        "lit": "^3.3.0",
        "rollup": "^4.43.0",
        "rrule": "^2.8.1",
        "rsync": "^0.6.1"
    }
}
package.json
I won't go further into the implementation details on my blog, but if anyone who knows me irl is actually interested, I'm happy to chat about code or high-level implementation with you offline! I may publish my custom card to Github one of these days. I would likely have to make all my integration-specific behaviors configurable so it could be used with any todo list. But I mostly likely will never make the custom integration public because it's so specific to my use case.
Custom Integration Enhancements
I made a two major enhancements to the integration since my original post:
- Support undoing adhoc task completion
- While testing, I noticed that my calculation for the next date was producing unexpected results if an "every (interval) weeks on (day of week)" recurrence rule was used but the day the task was completed is on an earlier day of week. So I also fixed that.
- It realized that my algorithm would not work for an "every (interval) months on (...)" recurrence rule, but I wouldn't be using that type of rule on an ad-hoc task. At least not for now...
- It reminded me of my Todoist woes; I wonder if their algorithm is similar to mine...
- Add service to get all tasks
As a side note, while I was working on the enhancements, I did attempt to switch to Google Calendar Simple API. This would've been great except it makes blocking HTTP requests, which Home Assistant was not happy with. It wasn't difficult to call some of the underlying services of gcal_sync to call Google Calendar APIs that aren't formally exposed (mainly the API to fetch instances of a recurring event).
In order to support the "Show all tasks" UI, I added a service to my custom todo entity. This is basically an action that can be run on an instance of my custom todo entity. For reference, my custom card calls built-in services to perform update/delete operations on todo list items.
For testing purposes, I called my service through the Home Assistant Developer Tools.
I had to make two Google Calendar API calls and combine the results to get the final list of tasks.
- Fetch all single events or instances of recurring events starting from 4 weeks before today until 1 year + 4 weeks after today
- This returns both completed and pending tasks, so I filtered out completed tasks in post-processing. (This is the same logic used to fetch pending tasks from previous weeks.)
- Fetch all single or recurring events, excluding instances of recurring events, starting from 4 weeks before today with no end date restriction
- This was returning a few instances of recurring events, and I couldn't figure out why and didn't want to debug more, so I just filtered them out in post-processing.
The list of pending events from #1 is reduced to a map of single/recurring event ids to due dates. The list should already be in order by date from the API call, so if there's multiple instances of the same recurring event, only the first instance's due date will be tracked and the rest will be ignored.
Then, combine that with #2.
Huzzah.
I'm tired of writing. You're tired of reading. Goodbye for now.